Solar

Let’s Refurbish a Van – Part 7: Our Batteries Phase 1 (By Andy)

A Post by Andy

{Note: The work detailed in this part of the post was completed over the summer of 2015, before we moved into the Turtle. I am just getting to writing the post now.}

So, we like to have our computers run, have lights, have the controls for our fridge work, have a charged Wi-Fi hotspot, and have our furnace fan powered to keep us warm. For all this we need electricity, and since we want to be off-grid, we need batteries. We started with this:

HouseBattery

If you are familiar with the Turtle, this compartment is behind the largest access door on the passenger side- the door with the vent in it. In the following photo, I put in a dotted line where the plane of the floor on the inside intersects the compartment.

firstbattery_floorline80

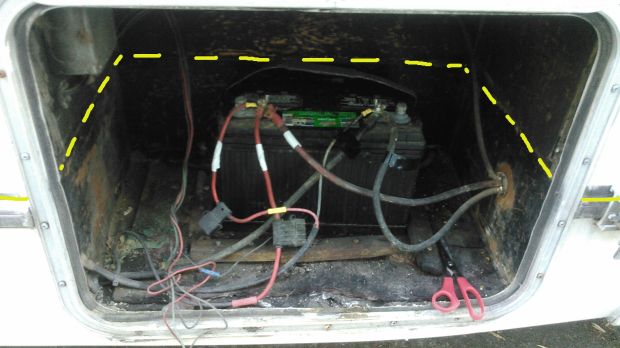
The walls of the compartment above the floor line are plywood, and bump up under the couch inside. The sides and bottom below the line are made of heavy steel. I have deduced the compartment was originally designed for a generator, as there was old 120V AC wiring running to it, an unconnected fuel line that ran into the back, and the door vent.

gimpprocessedimage95

I had a hard time figuring out what all the wires were hooked to, as it was a bit haphazard in the compartment. In the above picture, (1) is a port that goes outside, below the floor of the Turtle. The wires there threaded out of the box, ran a short distance under the Turtle’s floor, then threaded up through the floor to the old inverter. There is a second hole (2) that the wires from the old 100W solar panel and the wires between the battery and main 12V distribution panel were run. (3) is the unused electrical box that had 120V AC wires run to the compartment where the shore power cable is housed.

Maybe I should back up a bit and throw out a few concepts and definitions and explanations for the terms we will be using.

  • Battery: A thing that stores electricity in chemical bonds. Here, we are just referring to 12V lead-acid batteries.
  • 12V/12VDC/DC: 12 Volt Direct Current (DC). This is what cars use for their electricity for headlights, the radio, starting, etc. It is the kind of power all the batteries we talk about will produce.
  • 120v: 120V Alternating Current (AC). This is what is in your house and in businesses you know, the typical wall plug Amy and I look for at restaurants to plug our computers into. It’s generally 120, 121, or whatever it takes.
  • Current: The flow rate of electricity.
  • Voltage: The force pushing the electricity through the wires.
  • Inverter: An electrical box that changes 12VDC to 120VAC. It changes car electricity to house-hold electricity. This is so we can plug our AC computer cords into our DC batteries.
  • Converter: An electrical box that changes 120VAC to 12VDC. The opposite of the above—pretty much a garage battery charger that you use to get your car started after you leave the lights on.
  • Charge Controller: An electrical box that changes the output of the solar panels into DC voltage, hopefully charging the house batteries.
  • House Battery: Now, I probably use this too freely. When I talk about house batteries, and I mean batteries dedicated to our living compartment. If I say house (or household) electricity, I mean 120 V AC. Got to figure this out… but, house batteries are 12V batteries separated from the car system, and dedicated to lights and heat and powering the inverter in the house part of a van. One should be able to run these dead flat, and the car will still start, as they are fully independent circuits.
  • Starting Battery: The batteries under the hood, used for starting the car, sparking the gas when the engine is running, running a radio (if you had a functional one), and lighting the headlights.
  • Shore power: Kind of a boat term, but a source of 120V AC electricity you can plug into. When you pull up at a friend’s house, and pull out your extension cord, and plug into their electricity, they are your “shore power”. (Thanks Alex and Julie, Kari and David, Connie, Mag and John, Dave and Ryanne, Mike and Becky, Blake and Martha, Roger and Mary, Chris, Dad…)

Now, back to the good stuff! To start the battery box rebuilt and modification, I first labeled the wires and removed the old battery. I then cleaned the compartment with baking soda and water to neutralize the sulfuric acid and prevent further corrosion. Lucky, the metal compartment is super stout, so it was still in great shape. As usual, after a final thorough cleaning,  I caulked the seams and painted the compartment with black Rustoleum. I can’t find a picture of the completely empty, cleaned and freshly painted compartment, but trust me, it looked good!


After getting the compartment beautified, I cut and painted a plywood plate to fit into the bottom, bolted and glued it to the metal base of the box, and mounted battery trays to it. I painted up everything with oil-based paint and used stainless steel hardware to affix everything.

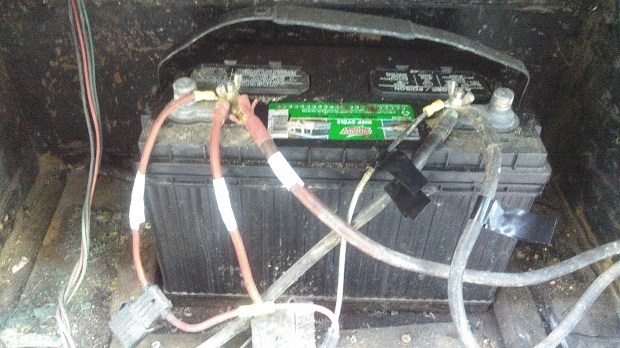
Since we had just gotten the Interlux blue boat paint, I practiced the painting technique on the top surface of the plywood base, so it is the same shiny blue as the Turtle exterior. In the following photos, you can see the two new Fullriver 115Ah 12V DC sealed AGM batteries that we started with in there, but just patched into the cleaned up existing wiring we are reusing at this point.


I decided to go with Absorbed Glass Matt (AGM) batteries. They cost a bit more than flooded batteries, but they do not spill, they will not develop corrosion at the terminals, and can be mounted sideways, if that configuration seems important. Additionally, they do not require venting, so they can be safely installed inside the living compartment, if that is necessary. Here is the site. We have been happy with this choice, and as you will find out in future posts, choosing AGM sealed batteries will allow us to make some future cold-weather modifications.

As to wiring, I was just starting to adopt the boat convention for new circuits and runs I would rewire. The convention is as follows: For 12VDC, yellow is ground, and red is positive. For 120V AC, the wires are white, black, and green for ground. Examples of the wires are here:


The reason behind adopting this convention is that at a glance, you can tell which circuit they are supposed to be wired to. Additionally, the boat 120V cable is stranded, as opposed to the household solid copper wire. Stranded wires should always be used in a vibration environment. Logically, then, a van should have no solid copper wires (though most RV builders do actually use cheaper solid copper for the 120V runs). As you might have observed, we have concluded that one should think of their van as a boat, and look to boat paints, wires, latches, and hardware for the upgrades and work. Though the boat cable is a little more expensive, it is paired and tinned for corrosion resistance, and gives a real nice finished look. Additionally, it can be purchased in any gauge.

So, at the end of our Phase 1 battery configuration we had our two new AGM batteries with a combined storage of 230Ah at 12V installed and secured, with the connections cleaned up. With this battery pack, we simply used the old converter to charge them when we were connected to shore power, and the old inverter to make our 120V for our computers when off-grid. At this point in our journey I also had just finished the install of our 300W of solar to charge the batteries (we will cover the panels and solar charging and solar controller in a different post).

That’s Phase 1 for you!

Let’s Refurbish a Van – Part 6: Roof Rack (by Andy)

A post by Andy

{Note: The work detailed in this post was completed over the summer of 2015, before we moved into the Turtle. I am just getting the time to write the post now.}

So, we have stuff to carry. And we want a place to store our solar panels. And we want to stay cool. And, if possible, look cool. So, we need to put together a roof rack…

Here are a few pictures of the old RV when we got it. It had an aluminum ladder that was old and worn, along with the typical RV aluminum tube luggage rack at the back- all bits with some of the mounts loose. We also had a big plastic storage box bolted to the top, but it was cracked and would certainly leak. As you can see, there was also one solar panel and a mount for what I’m pretty sure was a TV antenna. Good stuff, but it was all pretty worn, as it had all traveled for close to 30 years and more than 250 thousand miles.


We wanted our rack and top equipment to do a few things for us:

  1. Have a dry and accessible place to store camping and fishing and other fun gear, out-of-season clothing, and some spare parts and equipment.
  2. Have the rack removable, so we can maintain and fix the roof when the need arises.
  3. Have a location to mount the planned solar panels.
  4. Design the rack to provide us shade.
  5. Have a system that we can change, add more solar to, move things around, etc.
  6. Be able to fill and seal up all the holes prior people made when mounting things to the roof, and have a system where moving forward we will not be drilling into the roof any more.

Anyway, roof racks look great! I hear they can be useful too. In truth, we have pretty limited room and storage inside, so having a bit of room up top for our extra supplies and garage-like stuff was essential for a successful voyage.

So, to the step of getting the old stuff off and sealing up the holes. Pretty much unbolt the bolts and pry everything else off. I then used fiberglass impregnated epoxy body filler for all the big holes (I love epoxy!), maybe adding wire to support it as it cured. I then added Geocel Proflex on the seams. I read about and tried a few things, but to date, it is my go-to for exterior sealing. Here is a link.

For the (many) smaller holes, I would first clean and fill with the Geocel, then screw in a stainless steel screw the size of the hole, then cover the head of the screw with another layer of Geocel. It is a technique I read about on the internet, and it seems to have worked well so far. Again, it is not worth buying any hardware but stainless or grade 8. It does cost a little bit more, but use the savings you get for doing this yourself to get the good hardware. Plus, you don’t have to worry about some interior rust and redoing the work down the road. After sealing the holes, I put down Rustoleum on all the modified spots. The following pictures show the antenna hole through the roof, and some of the removed parts scattered in the yard.

We were lucky enough to have a friend who worked for Yakima who gave us a VIP discount card for one purchase. With the card, we got 12 A1 rain gutter towers, 6 78″ crossbars, 12 wide body rain gutters, end caps, two 12-peice lock core sets, a Loadwarrior basket, and some cargo nets. A truly impressive amount of wonderful Yakima pieces at a great savings. Boxes and boxes of sweet components!

From REI, Amy and I used our one-item 20% member discount and each of us bought a Skybox Pro 12, shipped to the Portland REI for free. We got the long and narrow boxes to configure end-to-end, and not take up too much roof area width-wise. We effectively have the roof racks for 4 vehicles, all to put up top the Turtle. It added up to a lot of initial investment, but it has been working well, and added an important comfort to be able to store a reasonable amount of things to make our small world flexible, and I think it actually has a sleeker look being made from components—as opposed to a custom-fitted rack. Since we were doing all the work ourselves, we decided to invest a bit more on some nice new hardware. After popping down to REI and loading our new Skyboxes (in their own boxes) onto the top of the old Scout, we stopped for a bite in downtown Portland. Seems fairly reasonable to me, but I imagine to some people we made a sight…

The sky boxes, along with the other hardware, sat in the house for quite awhile. After stripping and sealing the roof, it was only logical to finish painting the Tutle blue, then do the white roof paint, and then finally get to the point where we could install the new roof rack. Consequently, this is what our place looked like for quite an amount of time. (As you can see, our front room was used to store a number of Turtle parts until they were ready to install.)

The pictures are few here, but after most of the painting was finished, I mounted the wide body mounts. I measured, marked, measured again, checked, and had the geometry figured out. On the corner of the Turtle roof, I would drill my two holes, fill with Geocel, cover the mounting surface with Geocel, align the bracket, screw in two (you guessed it) stainless steel lag bolts, then cover the seam and outside with Geocel. After it all cured, we repainted with the Interlux. It looked nicer with the black brackets and shinny bolts before the sealant and paint, but I didn’t want to risk it. And, just so you know, the asymmetric spacing along the length of the roof is due to needing to align the crossbars so they will not interfere with a roof vent when open, but also allow for the mounting points of the skyboxes. Here are the brackets installed:

kimg0798

It is a nice feeling to know that at any point we could unlock (all keyed alike, now) the 12 towers, unscrew, and remove the whole rack if we had to do some maintainence on the topside. Anyway, the pictures are limited at this point, but following are some involving the tower, crossbar, and rack install.

kimg0804

You might notice that the Yakima basket lost out to the solar panels. The basket is in the storage unit presently, and it would be great to get it up there at some point. When we were building and installing the rack, though, the geometric logistics were far too difficult for the time allocated. Anyway, to install the solar panels, I bolted two pieces of 12′ 6061 T6 aluminum square tubing to the crossbars with stainless steel carriage bolts and nuts fitted through the Yakima Universal Snaparounds.

I picked up used ones super cheap here. By the way, ReRack in Portland are nice people and can save you some money on roof racks, so check them out if you are in the area. Back to topic, after getting the aluminum properly spaced and installed, I then drilled and screwed the solar panel brackets to the the aluminum. That step was a breeze. Solar panels installed, photo taken probably a month in.

kimg0938

As to keeping it all cool. We planned on (and did), paint the roof surface with a couple of coats of Interlux topsides white boat paint. We actually painted the roof vent covers white as well. The assumption is that paint will reflect much of the sun’s heat, and be able to withstand the UV rays. So far, everything looks pretty good up there. We have some cracks in the paint where the caulking we used was not completely cured before we painted (I don’t blame the paint, we had time constraints), so we have some washing and fixing of some seams to do. Otherwise, all looks pretty good. A common approach for keeping a bit cooler is to have a couple of roofs, effectively carrying your own shade along with you.

The above old-school Rovers have a second roof with an airgap for passive cooling in the hot sun. (Side note, did anyone notice the tall skinny tyres the rovers are running on?) With the spacing added from the rack towers, and mounting the solar panels and boxes above the crossbars, we have a impressive air gap and continous shade on over 50% of the roof.

Currently, there is a middle strip free for walking, in which I will fit an additional panel at some point, then simply make some cheap synthetic or plywood panels and paint them white to increase our shade to close to 100%. So far, though, we have been to the Badlands of South Dakota in the summer, and have stayed with the ambient temperature with thoughtful venting and minimal electric fans.

To me, the goal is not to be cooler than the outside, all we need to do is not be hotter than the ambient temperature in all kinds of weather.

kimg0184

Oh, almost forgot, we want to access the roof! We need to clean the solar panels, get stuff into and take stuff out of the boxes, check on all the paint and seals, and most importantly, be able to climb up and yell with arms outstretched like you are in a movie! Anyway, the ladder…

We actually bought a car roof rack ladder as a start. The almost $200 ladder (seems crazy) was well worth the money, in the time saved. It always feels pretty weird to buy something new, remove it from the box, then start cutting it right away. So, the ladder, welding, adding more rungs for the proper length, and fixing the folding function.

Some close-to-final pictures here. We started with a 9-rung foldable ladder, and ended with a 12-rung rigid ladder that bolts to the bumper and the top rack. Again, it was designed to bolt to the bumper and rack, so it is removable…

I’m pleased with the removability of the ladder, because we crushed it a bit when we backed into a tree one day, about a week after it was finished and installed. The ladder was subsequently unbolted, straightened, and remounted. From the side, it now does have a bit of ripple (below the designed joint and by the spare tire)—this is what we call life.

kimg0186

To sum up a bit, up in the boxes right now we have a few fishing poles, extra wire and parts and unfinished projects, cloth for sewing projects, extra window insulation, snow shoes and masks and fins, river tubes, my old tent. A pair of driving lights I have yet to wire up. Some cheap speakers I plan on installing in the doors. You get the picture. We call it our attic.

img_1863

We have a completed rack now. It holds our solar panels, is our attic, and still has room to exapand.


Andy Wears Shorts in the Snow: Christmas In South Dakota

Happy New Year, everyone! Woo hoo!

2016 was a super exciting year in the Turtle, and the coming year should be equally full of challenges, victories, and vistas (and frisbee sessions for Scouty).

img_6685

Before I get into our plans for the upcoming months, let’s catch up with some photos of what we’ve been up to since we left Yellowstone National Park last month! Since that very chilly week living in single-digit temps, we’ve learned a bunch about what we needed to do in order to better winterize the Turtle. So before we left Montana, we headed back to Mom’s house in Bozeman and got busy buttoning everything up with layers of insulation over the windows, extra curtains to divide the colder cab and loft from the warmer living portions of the Turtle, and some modifications under the hood.

Naturally Andy was in charge of the under-the-hood tasks, and he spent the week in Mom’s garage finalizing work on the second alternator. With that new addition we can charge our house batteries while we drive, as the solar panels aren’t getting a lot of sun in these winter months. Not surprisingly, this guy took the opportunity for a wiring project and really brought it to the next level. Give an engineer an electrical mission, and he’ll buy all the toggle switches Home Depot has in stock and create a panel worthy of the dashboard of a UFO. I still need to take a photo of the installed panel, but the process picture gives you a pretty good idea of the extent to which this guy takes on a project!

img_6628

Meanwhile, in between my winterizing duties, I got an extra week to hang out with my mom, sister, brother-in-law, nieces and nephews. We crafted, played video games, and I took on a request for a Photoshop job: Clive wanted to see himself in his “boat” on the water. . . “with a beard!” Turns out that kid could totally pull off a beard.

Even Gracie appreciates how awesome these kids are.

The snow continued during our stay, much to Scout’s delight. This border collie LOVES snow! He leaps through the drifts with abandon, and runs back and forth between us, trying to encourage us to run along with him.

img_6680

Gracie, on the other hand, finds the warmest covered spot and settles in.

img_6690

After getting used to living as locals, it was hard to leave all my favorite people. It was such a treat that we were able to spend so much time with them though. In the Pre-Turtle days, we were typically limited to a week each year at most for visiting family. So I can’t get too greedy when I just got to hang around for a whole couple of months!

Once the improvements were complete, and I felt confident that the kids were ready to love The Legend of Zelda without further encouragement from their auntie, we left Bozeman. After a quick stop in Billings to see Blake, Martha, Harper, and Grant, we then made our way toward South Dakota. We drove by Little Bighorn Battlefield right before it closed for the day, and took a brief walk through the grounds as the chilly winter sun set.

Then with the heater on full blast, we moved on to Gillette, WY for the night where I got so unbelievably sick. (I’ll only include this because I promised in a previous post that I wouldn’t overlook the portions of full-time vandwelling that are challenging, and this was just AWFUL.) I’ve gotten sick a few times since we moved into the Turtle, but they were mostly mild illnesses that were inconvenient but tolerable. I’ve never gotten violently ill while living in the Turtle until that night in Gillette, and it definitely was more challenging than getting sick in a house.

I thought I had food poisoning, as I got sick so abruptly, but in retrospect I think it was likely a severe flu. I was vomiting so much all night (essentially into a pit toilet) that I got massively dehydrated, and unfortunately since we were in freezing temperatures our water tank had frozen and cracked and we had been carrying water around in jugs. As luck would have it we were low on water that night, so I was rationing water and sucking on ice cubes and trying not to step on Andy on the pull-out couch as I got up every 20 minutes to vomit. And the next day we had to move along, so I was sleeping fitfully on a bed rocking and bumping at 65 mph on the freeway. Glamorous!

So, there you go. Full-time vandwelling is not all roses. But for the record, I’m not trading it for anything!

At any rate, while I was in my sicky fog Andy got us to Spearfish in time for Christmas with his family. Much to Scout’s delight, the ground was covered in snow, with a whole bunch more in the forecast.

img_7103

And much to Andy’s delight, there were plans to assemble a Lego train which would travel around the Christmas tree! I’m not sure how many total man hours were spent around the table between Will, Ellie, Andy and myself, but Andy outshone us all with his dedication to the cause, as well as his impressive Lego skills.

Between the four of us we created quite a spectacular Christmas train, if I do say so myself.


Ellie and I worked on Rudolph’s Christmas Car which led the way, and created bunches of Lego presents. Will put together the engine, the middle cars, the flatbeds, and made a magnificent cubist Christmas tree. Andy made a tippable car that he’d originally intended for imaginary molten metal, but that Ellie and I filled with our gifts instead. He also made a caboose equipped with a crane to hoist and deliver the packages, and it really works, and it’s awesome.

Each day we were surprised by the dramatic change in weather. One day: blizzard. (Andy wore shorts all day.)

The next day: sun.

The next day: more snow.

The next day: more sun!

Snow.

Sun.

You get the idea.

Highlights of our time in South Dakota also included:

  • Testing out the newly-wired Hella lights. . .
  • Learning about the difficulties of dumping tanks in winter when all the RV sites for miles around are closed for the season. . . (For those interested parties, it includes making friends with the on-site owner of a closed RV site and graciously being given permission to use the facilities if you can find it and not break anything, digging through the snow until you find the port, boiling hot water, filling a container with hot water, pouring it over the frozen cap until you can open it, taking a photo while your significant other waits for your assistance.)

img_7137

  • Being co-planner for a stuffed animal beach wedding. . .
  • Waiting to see how Andy will alter the “LOVE” Valentine’s decorations his sister put on the mantle. . .
  • Towing stranded passengers out of a snow drift. . .

img_7195

  • Finding Gracie tucked into cozy spots on the coldest days. . .
  • Scout just driving around town. . .

img_7226

  • And knowing Christmas is officially over when you see the Christmas tree ablaze.

img_7206

Coming up: We’re done with snow and are going to Mexico!

P.S. If you enjoy following along with our blog, don’t forget to click the “Follow” button, and you’ll get an email whenever we post! 🙂


Sleepin’ On The Streets: A Beginner’s Guide To Boondocking

One of my favorite Andy quotes happened outside the Baghdad Theater in Portland a few summers ago, when we still lived in a house.

We were sitting on the patio after a matinee, drinking a beer and talking about how excited we were to begin our upcoming vandwelling life. I said something about wishing we lived in the Turtle already, and how much fun it would be if we could just walk a block down Hawthorne and be “home.” Andy beamed and said, “Isn’t it exciting? By this time next year we’ll be living the dream: sleeping on the street with our half-wild dog and our garbage cat.”

It’s become our motto.

On that note, I recently realized that I’ve neglected to discuss a topic that is super fun and potentially useful to other wanderers, so. . . let’s talk about boondocking!

img_0842A place we lived for a night in Corvallis, Oregon

One of our favorite things about full-time vandwelling is the freedom we have to roam around without worrying about where we’ll stop for the night, allowing ourselves to really live in the moment. We have the ability to go where our interests blow us without worrying about planning around a place to sleep. At this point we’re a year into off-grid Turtle Life and feel completely comfortable and confident pulling over and finding places to stay overnight, but when we started out it was pretty daunting and we spent a lot more money staying in RV parks and camp sites when we didn’t need to. I know we still have lots to learn, but I’m here to share what we wish we would have known a year ago!

*An important note here is that the type of boondocking I’m referring to is not a long-term off-grid stay in the woods. I’m talking about the type of boondocking common with full-timers, which is traveling down the road and stopping for the night as we pass through an area, waking up, packing up, and continuing along our travels. Once we get into long-term boondocking, we begin talking about on-board fuel supply, second alternators, etc. and that’s a whole different conversation.

img_2263
Some BLM Land near Jewel Cave National Monument, in South Dakota

It’s so liberating to realize how easy it is to get around when your house is on your back and you can just stop wherever you want! But you do need to get equipped first.


Let’s start off with the things we’ve determined necessary for comfortable boondocking:

  • Heat supply: Diesel or propane
    • We’ve got a propane heater wired into the Turtle which is wonderful, and effective in heating up our small space quickly. Diesel works great too.
  • Power supply: Either a generator or solar panels and batteries
    • Andy will write a technical post on this one at some point. Lots to say here! We’ve got solar panels and three batteries that, with regular sun, will keep us charged indefinitely. This includes our computers, interior lights, etc.
  • Water storage
    • The Turtle has a water tank plumbed to the sink and bathroom, but when we bought it the water pump wasn’t working, and we lived happily with refillable water jugs for a good long time.
  • “Some sort of bathroom” is how Andy worded it. . . 🙂
    • If you have a bathroom in your vehicle it’s pretty magical! If you don’t, you can get away with boondocking at rest areas, and using the facilities at the big box stores that let you stay overnight, and of course there’s always the great outdoors. (Andy suggests empty jugs, but he also lived way out in the bush in Kenya for a number of years, so. . .) But if you’re deciding between two vehicles and one has a bathroom, I recommend the one with the loo. It just frees up loads more off-grid options.
  • Food storage and preparation
    • This can be a simple plan, but it’s worth adding to the list. Keep some food with you and have a way to prepare it. You know, like life.
img_2968
Breakfast in Garnet Ghost Town Parking Lot

Now let’s talk about where you can stay:

  • Wherever you want!
  • Just kidding; there are restrictions. But fewer than you might think.

As I mentioned, when we started full-timing we weren’t sure how the boondocking was going to work out. Most of the literature we read about full-timing was written by and for an audience who planned on spending most of their time in RV parks. We enjoy when we stay in parks very much, but we’ve primarily got our sights set on simplifying and being independently mobile. Also, there were a few books we read in which the author was paranoid about getting harassed by the police for staying somewhere overnight, and at first we thought it was something to hide and be nervous about. (It’s not.) So it took us a while to find what worked best for us, and what we discovered is that there are loads of legal options!

img_2766
Public land somewhere between Bozeman and Missoula, Montana
img_2798
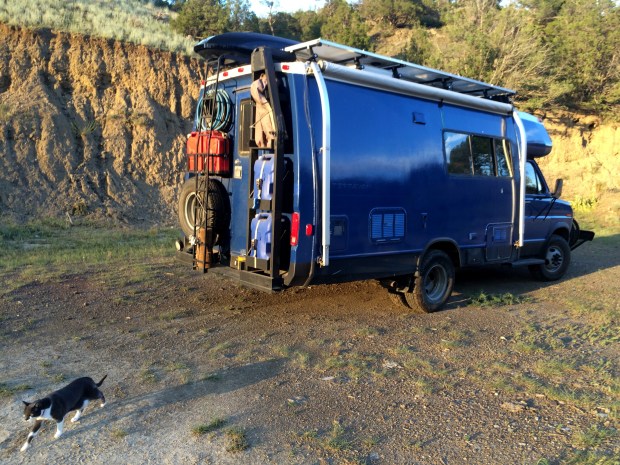
The sunset at that spot, later that evening. . . a pretty nice backyard

Here are the things we’ve learned about where it’s legal to stay overnight:

  • Most states that we’ve researched allow for overnight parking unless otherwise posted, usually for 10-12 hours max. And where it’s not allowed, it’s very clearly posted. And where it is legal, you can usually find signs stating the rules.
  • This includes parking in towns, because in the states we’ve visited at least, it’s only illegal to “live” in a vehicle on the road for more than 72 hours. It will likely vary from state to state, but we’ve never had any trouble just staying overnight in an area that didn’t have posted parking restrictions.
  • Lots of spots that allow overnight parking will post “No Camping,” which we have learned means that you can’t have a camp fire, put chairs outside, extend any slide-outs, or roll down your awnings. Basically you can’t do anything but park, which is all we need! I always thought it meant no overnighting of any kind, but you can stay there as long as you don’t start setting up your living room outside your vehicle.
  • Rest stops are actually places to stop and rest! We see lots of other RV’s and vans parked overnight at rest stops now that we’re paying attention, and the nice thing is that they’re usually well-lit, have bathrooms and potable water, and often have nice spots to walk the dog (and if you’re us, the cat). It had honestly never occurred to me that you could spend the night at a rest stop, because I’d never needed to. But there you go!
  • We’ve enjoyed very much the realization that you can stay at scenic viewpoints and historic pull-outs along the interstate. Again, each state determines how long you can stay, but in our experience it’s always a night’s sleep worth—around 10-12 hours or so. We’ve woken up to gorgeous views of towering rocks and rivers in the middle of mountain ranges that we would have just blasted through. A lovely and novel spot to drink coffee while the dog does his morning business.
  • BLM land is available for dispersed camping, and has been a favorite of ours. According to their website, “camping on public lands away from developed recreation facilities is referred to as ‘dispersed camping.’  These sites are widely dispersed, undeveloped, and are generally not signed as campsites.”  You can stay for up to 14 days, have camp fires as long as you monitor them closely, and it’s a great spot for the pets to run and play.
  • As many of you know, lots of big box stores and travel plazas allow for overnight parking. We haven’t done that as much, because we love grass and so far there has been a lot of grassy spots available to us. But it’s an option, and a nice one if you need to grab supplies too.
  • At first we thought when parking in town we’d be happiest parking somewhere quiet without night traffic, like by a park or school, but then decided that a van parked overnight by a school could attract negative attention. After a fair number of trials, we’ve found that we’re most comfortable parking on—or on a side street of—the main drag of smaller towns. There’s not much night traffic typically, and it doesn’t look as sketchy to the neighbors if a vehicle is parked overnight on the road under street lights as it would in front of their house. Even though it’s legal to park in neighborhoods, we like to make sure that we’re not imposing on anyone either. Not to mention if we’re near any night life, we can explore town, hang out at the local spots, and then just walk 10 steps home without designating a driver. Safety first, guys.
  • There are bunches of resources for people like us, to help avoid the sometimes-annoying driving around looking for the ideal spot. The ones we like best are:
    • Overnightrvparking.com: Our first favorite, and the one that got our boondocking education started. It shows on a map where there are free places to park for the night so you can plan ahead. It tells you if it’s a rest stop, scenic viewpoint, etc. and what facilities are available at that spot. This site is user-driven, but the administrator evaluates all submissions and posts whether or not the spots are legal and safe. It was just $25 for the year, and right away we got well over our money’s worth for it!
    • Allstays.com: We love this one because it lists everything. As their website states, it shows “Over 29,000 Campgrounds: Independent, KOA, National/State Forest, State Parks, Public Lands, Army Corps, National Park, Military, County and City Parks, Casinos.” It tells you if it’s free or has a fee, how much it costs, and what amenities are available. The app also lets you see where there are dump sites, propane, potable water, and other resources. It’s a must-have.
    • iOverlander: Much like Allstays it’s got everything, but includes a lot of information about places to stay outside the United States and additionally shows points of customs and immigration.
img_1990That time we lived on a lake

The very best part of an off-grid traveling life is that we get to try out being locals in towns all over the states, every day! We’ve really enjoyed the simplicity and flexibility it affords us, not to mention how inexpensive it is to visit new places. We can wake up in a city one day and in the woods the next. I can’t believe I waited this long to figure out that this was possible.

A lot of people are curious to know if we feel anxious about boondocking, especially in towns or populated areas. At first, yes, we were very aware of the fact that we were on a street and in an unfamiliar town. We took a very long time to find a spot, and when we found one we were careful to stay quiet and keep a low profile. After we understood the rules, though, and got a feel for what worked best for us, that completely dissolved. Now what’s remarkable is that we’re so used to it that when we close the door, we’re just home. We watch movies, listen to music, have friends over when we’re in town, and pop right out the back door in the morning to walk to a coffee shop or let the dog out. It’s so exciting to wake up in your own house, cuddled up to your person and your pets in your own warm bed, and in those first few seconds not to remember where you live!

img_6483
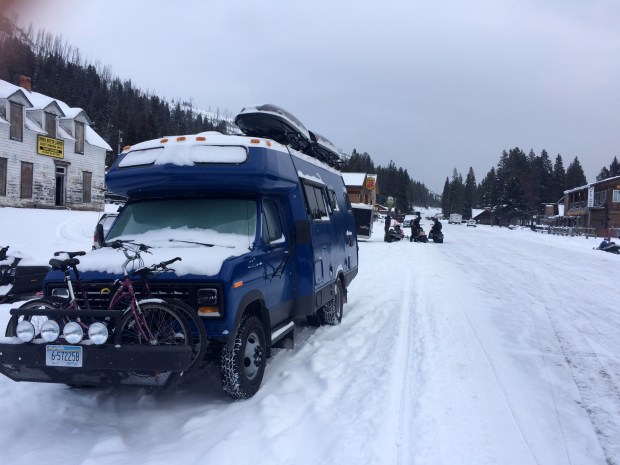
Cooke City, Montana. . . The morning we woke up to the roar of a town full of snowmobiles!

Every day really is a new adventure. And we’re ready to see what tomorrow will bring!